

The following post outlines a very simple example to get you started with Sitecore’s Data exchange framework. It outlines how to create and debug a basic example of a new pipeline batch.
There are some great highly detailed walkthroughs on the official site located here. The preceding link will also give you some detailed information on the framework if you are not familiar with it as yet.
After reading through the official documentation I thought it might helpful to have a working example and to detail the steps needed to create a new pipeline in a simple fashion, the full source code of this example is located on my GitHub located here.
All the supporting Sitecore items are also located in the project as a Sitecore update file.
This example describes the following high-level steps:-
- Creating a new pipeline processor assembly.
- Creating a new data exchange framework tenant, batch, pipeline and pipeline step to use the custom processor assembly.
- Creating a new endpoint to pass configuration information to a custom processor.
Prerequisites :-
- Visual studio 2015
- Sitecore 8.2 with Data exchange framework installed, located here.
Step 1: Create a Visual studio project and add the references
- In Visual studio create a “Class library” project

- Add references to the following assemblies…
- Sitecore.Kernel (“No references” suffix if you are using NuGet)
- Sitecore.DataExchange
- Sitecore.Services.Core
You can add the reference from your website bin directory but it is better to use the public Sitecore NuGet server which can be found https://sitecore.myget.org/F/sc-packages/api/v3/index.json.
3. Add new folders for the following
- Converters\Pipeline
- Processors\PipelineSteps
Your project structure should end up looking like this (without the classes which we will add later)…

Step 2: Add classes to support custom pipeline
The converter class
First, we create a “Converter” for the new step we are going to create, this class will extract the values from our custom endpoint we will create later.
An endpoint is a Sitecore item that holds configuration information for the step so we don’t have to hardcode any setup information.
- Add new class called “ExamplePipelineStepConverter” under Converters > PipelineStep
- Extend class “DefaultPipelineStepConverter”
- Implement the abstract class and create the constructor
- Add the code to the “AddPlugins” method, should look like this…
This file contains hidden or bidirectional Unicode text that may be interpreted or compiled differently than what appears below. To review, open the file in an editor that reveals hidden Unicode characters.
Learn more about bidirectional Unicode characters
| // ——————————————————————————————————————– | |
| // <copyright file="ExampleEndpointConverter.cs" company=""> | |
| // | |
| // </copyright> | |
| // <summary> | |
| // Defines the ExampleEndpointConverter type. | |
| // </summary> | |
| // ——————————————————————————————————————– | |
| namespace Sitecore.DataExchange.Example.Converters.PipelineStep | |
| { | |
| using Sitecore.DataExchange.Converters.PipelineSteps; | |
| using Sitecore.DataExchange.Models; | |
| using Sitecore.DataExchange.Repositories; | |
| using Sitecore.Services.Core.Model; | |
| /// <summary> | |
| /// The example endpoint converter. | |
| /// </summary> | |
| public class ExampleEndpointConverter : DefaultPipelineStepConverter | |
| { | |
| /// <summary> | |
| /// Initializes a new instance of the <see cref="ExampleEndpointConverter"/> class. | |
| /// </summary> | |
| /// <param name="repository"> | |
| /// The repository. | |
| /// </param> | |
| public ExampleEndpointConverter(IItemModelRepository repository) : base(repository) | |
| { | |
| } | |
| /// <summary> | |
| /// The add plugins. | |
| /// </summary> | |
| /// <param name="source"> | |
| /// The source. | |
| /// </param> | |
| /// <param name="pipelineStep"> | |
| /// The pipeline Step. | |
| /// </param> | |
| protected override void AddPlugins(ItemModel source, PipelineStep pipelineStep) | |
| { | |
| var settings = new ExampleSettings(); | |
| var endpointFrom = this.ItemModelRepository.Get(new System.Guid(source["EndpointFrom"].ToString())); | |
| if (endpointFrom != null) | |
| { | |
| settings.CreatePath = endpointFrom["Create path"].ToString(); | |
| } | |
| pipelineStep.Plugins.Add(settings); | |
| } | |
| } | |
| } |
The settings class
The setting class will hold the configuration information for the step once it’s extracted from the Endpoint Sitecore item.
- Add new class called “ExampleSettings” under Converters > PipelineStep
- Implement interface “IPlugin”
- Add a property for “CreatePath”, should look like this…
This file contains hidden or bidirectional Unicode text that may be interpreted or compiled differently than what appears below. To review, open the file in an editor that reveals hidden Unicode characters.
Learn more about bidirectional Unicode characters
| // ——————————————————————————————————————– | |
| // <copyright file="ExampleSettings.cs" company=""> | |
| // | |
| // </copyright> | |
| // <summary> | |
| // The example settings. | |
| // </summary> | |
| // ——————————————————————————————————————– | |
| namespace Sitecore.DataExchange.Example.Converters.PipelineStep | |
| { | |
| /// <summary> | |
| /// The example settings. | |
| /// </summary> | |
| public class ExampleSettings : IPlugin | |
| { | |
| /// <summary> | |
| /// Gets or sets the create path. | |
| /// </summary> | |
| public string CreatePath { get; set; } | |
| } | |
| } |
The Pipeline step class
The pipeline step class does the actual work and represents a step within the pipeline using the process method. It uses the endpoint settings that are retrieved by the converter to execute the logic for the step. In this case, we are just extracting a data source path, you can extend the example to use the path to perhaps create some items on the content tree somewhere.
- Add new class called “CreateSomeItems” under Processors > PipelineSteps
- Extend class “BasePipelineStepProcessor”
- Implement the “Process” method.
This file contains hidden or bidirectional Unicode text that may be interpreted or compiled differently than what appears below. To review, open the file in an editor that reveals hidden Unicode characters.
Learn more about bidirectional Unicode characters
| // ——————————————————————————————————————– | |
| // <copyright file="CreateSomeItems.cs" company=""> | |
| // | |
| // </copyright> | |
| // <summary> | |
| // Defines the CreateSomeItems type. | |
| // </summary> | |
| // ——————————————————————————————————————– | |
| namespace Sitecore.DataExchange.Example.Processors.PipelineSteps | |
| { | |
| using Sitecore.DataExchange.Contexts; | |
| using Sitecore.DataExchange.Example.Converters.PipelineStep; | |
| using Sitecore.DataExchange.Models; | |
| using Sitecore.DataExchange.Processors.PipelineSteps; | |
| /// <summary> | |
| /// The create some items. | |
| /// </summary> | |
| public class CreateSomeItems : BasePipelineStepProcessor | |
| { | |
| /// <summary> | |
| /// The process. | |
| /// </summary> | |
| /// <param name="pipelineStep"> | |
| /// The pipeline step. | |
| /// </param> | |
| /// <param name="pipelineContext"> | |
| /// The pipeline context. | |
| /// </param> | |
| public override void Process(PipelineStep pipelineStep, PipelineContext pipelineContext) | |
| { | |
| var exampleSettings = pipelineStep.GetPlugin<ExampleSettings>(); | |
| if (exampleSettings != null) | |
| { | |
| pipelineContext.PipelineBatchContext.Logger.Info( | |
| "Hello world! Create some items here…" + exampleSettings.CreatePath); | |
| } | |
| } | |
| } | |
| } |
Step 3: Build and deploy
- Build the solution
- Browse to the compiled assembly in the bin folder of your visual studio project.
- Copy your custom assembly e.g. Sitecore.DataExchange.Example.dll, to the “Bin” directory of your Sitecore site e.g. c:\inetpub\MYWEBSITE\bin.
- Also, copy the .pdb file if you would like to debug e.g. Sitecore.DataExchange.Example.pdb
Step 4: Create Sitecore data exchange framework items
Now that we have created the custom assembly we need to let Sitecore know how to use it. We will do so by creating the Sitecore items necessary to process a new pipeline batch.
Create new Data exchange tenant
A tenant holds a logical collection of data exchange items, for instance, in the Sitecore commerce products a tenant is created to hold all the integration processes between Sitecore and a particular ERP system.
Once you create a tenant all the supporting items are created automatically below it.
- In the Sitecore content editor go to System > Data exhange
- Right click on “Data exchange” and select “Insert new Data exchange tenant”.
- Call the tenant “Example tenant”.
- Open the new tenant item and make sure it is enabled.
Create new templates for pipeline step and endpoint
We need two new templates to create the structure for our new pipeline step and endpoint.
- In the Sitecore content editor go to Template > Data exchange >Providers
- Create a new folder called “Example provider”
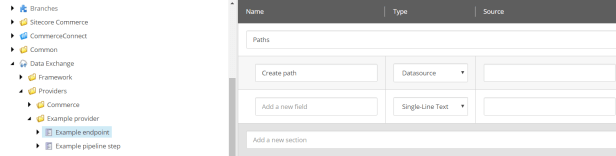
- Create a new template in the folder called “Example endpoint”
- Inherit the template “ /sitecore/Templates/Data Exchange/Framework/Endpoints/Endpoint”
- Create a new section on the template called “Paths”
- Create a new field on the template called “Create path”, make the type “Datasource”. Should look like this…
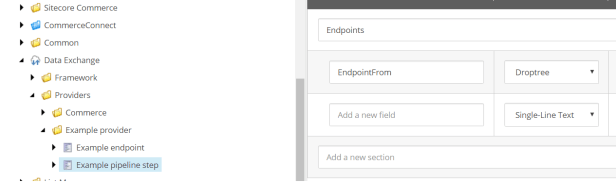
- Create a new template in the folder called “Example pipeline step”
- Inherit the template “/sitecore/Templates/Data Exchange/Framework/Pipeline Steps/Pipeline Step“
- Create a new section on the template called “Endpoints”
- Create a new field on the template called “EndpointFrom”, make the type “Droptree”. Should look like this…
Create Pipeline batch, Pipeline and Pipeline step
Now we have all the components necessary to complete the setup of our example Pipeline batch and execute for the first time.
- In the Sitecore content editor go to System > Data exchange >Example tenant
- Go to the EndPoints > Providers folder and add a new EndPoint by right clicking and select “New from template”, use the template “Example template” we created earlier.
- On the Endpoint item select a new data source for the “Create path” field e.g. /sitecore/content/Home

- In the Sitecore content editor go to System > Data exchange >Example tenant
- Go to the”Pipelines” folder and add a new pipeline by right clicking and select “New pipeline”, call the pipeline “Example pipeline”.
- Right-click on the newly created pipeline and select “Insert from template”, select the “Example pipeline step” template we created earlier.
- Call the step “CreateSomeItem” (You can call it what you like but its good to use the same name as the Class in your visual studio project)
- Under “EndPoints” select the endpoint we created in the previous steps.
- Enable the step
- Set the “Converter type” to the converter class from our custom assembly e.g. Sitecore.DataExchange.Example.Converters.PipelineStep.ExampleEndpointConverter, Sitecore.DataExchange.Example
- Set the “Processor type” to the converter class from our custom assembly e.g. Sitecore.DataExchange.Example.Processors.PipelineSteps.CreateSomeItems, Sitecore.DataExchange.Example.
- Should look like this…

- In the Sitecore content editor go to System > Data exchange >Example tenant
- Go to the”Pipeline batches” folder and add a new pipeline batch by right clicking and select “Insert pipeline batch”, call the pipeline batch “Example batch”.
- Under pipelines select the pipeline we created earlier
- Enable the batch, should look something like this…

Step 5: Run and debug
Alright so now we have created all the items necessary to execute our first example pipeline batch.
- In the Sitecore content editor go to System > Data exchange >Example tenant
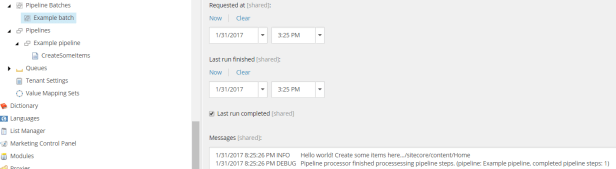
- Go to the”Pipeline batches” folder and select the Pipeline batch we created named”Example batch”.
- You should see a “Data exchange” option in the Ribbon.
- Press the “Run pipeline batch” button
- The pipeline should run
- Reselect the batch and scroll down to the “Summary” section, you should see something like this…
To debug, make sure you have copied the .pdb of your custom assembly into the bin directory of your Site.
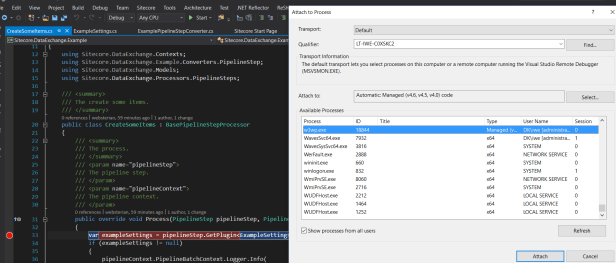
- Open your project with Visual studio.
- Put a breakpoint in the “Process” method of the CreateSomeItems class.
- Under “Debug” in the top menu select attach and attach to the relevant “w3wp” process for your Sitecore session.
- Go into Sitecore and run your pipeline batch using “Run pipeline batch” button.
- Your breakpoint should be hit.
- Example…

Many thanks for useful article, you helped me a lot.
LikeLike
Thanks for putting this out there. Simple to follow. I am going to give this a try.
LikeLike
Thank you, great post. Especially the part on how to debug.
LikeLike