
 development machine with a Dynamics AX 2012 demo VM hosted on Azure")
THE FOLLOWING STEPS ARE FOR A DEVELOPMENT ENVIRONMENT ONLY AND SHOULD BE USED AS A GUIDE ONLY
The following article outlines a simple way to enable this scenario but is not an officially supported approach in any way. You may want to tweak the steps or modify them slightly to make things more robust or secure. This article is intended to be a guide to the issues faced using this type of topology and simple ways to overcome them.
In order to use an on-premise SCpbMD development machine (i.e. not hosted on Azure) with a Dynamics AX demonstration VM hosted on Azure, there are a few small configuration changes you need to make to Azure, the Dynamics AX demo VM on Azure and the local Sitecore development machine.
This article assumes that your Dynamics AX demo VM on Azure is up and running, you have installed the SCpbMD reference site up to the point where you need to connect it to a Dynamics AX instance and all content is published and indexed.
The high-level steps are as follows :-
- Change the Sitecore transaction service commerceruntime.config to use the SQL server hosted on the Dynamics AX demo VM on Azure.
- Create two end points for the Dynamics AX demo VM hosted on Azure to allow the outside world to communicate with both the real-time service and the channel SQL database via the CRT.
- Add a binding to the Dynamics AX demo VM hosted on Azures IIS to allow https (will not use net.tcp)
- Add one line to the real-time service web.config on the Dynamics AX demo VM hosted on Azure to allow multiple https bindings.
- Modify some data in the channel database to return the cloud service public URL rather than the local machine name. There are more permanent ways of doing this via changing the setup in AX but the principle is made clear here, you are welcome to implement a more robust approach.
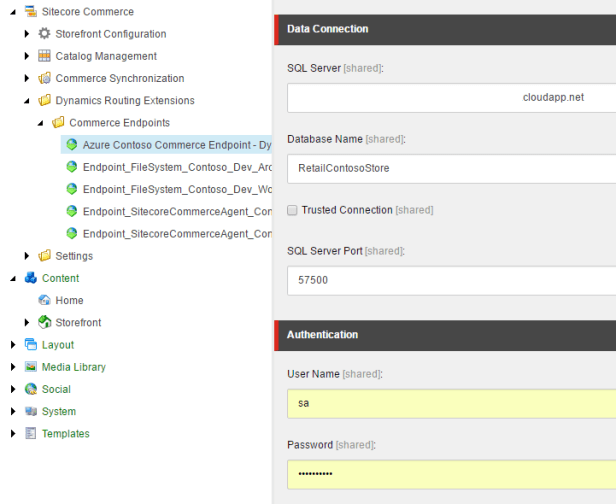
- Change the SQL server name in the Sitecore content editor
Step 1
Change the Sitecore transaction service commerceruntime.config to use the SQL server hosted on the Dynamics AX demo VM on Azure.
The transaction service needs to know how to communicate with Dynamics AX retail channel database via the CRT. As the database is on a VM hosted in Azure we need to use the public name of the server and the correct port. We will expose and map ports using an end point in later steps.
- Go the web.config for the transaction service which is usually located in
[site path]\Website\TransactionService
For example
C:\inetpub\wwwroot\sitecore81u3\Website\TransactionService
- In the connection strings section modify the connection string to use the cloud service name of the Dynamics AX demo VM hosted on Azure and the port 57500
For example
<connectionStrings>
    <add name="CommerceRuntimeConnectionString_5637144608" connectionString="Server=MY_MACHINE_NAME.cloudapp.net,57500;Database=RetailContosoStore;Integrated Security=false;User ID=sa;Password=PASSWORD" />
    <add name="CommerceRuntimeConnectionString" connectionString="Server=MY_MACHINE_NAME.cloudapp.net,57500;Database=RetailContosoStore;Integrated Security=false;User ID=sa;Password=PASSWORD" />
</connectionStrings>
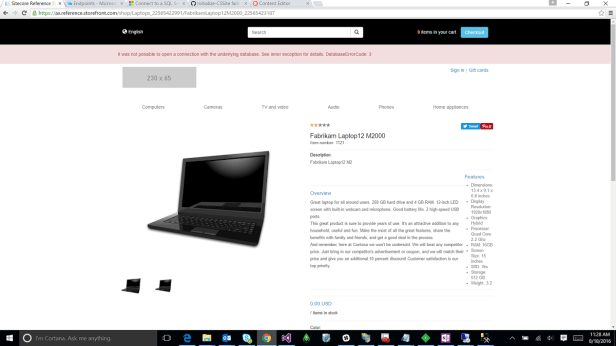
- Save and browse to reference site, you will not see any prices for items and if you view the details of any item, you will get an error stating that the site cannot connect to the retail channel database. This is because we have not configured the endpoints in Azure which we will do in the next step.
Notes
- You have to use SQL authentication, you can use “sa” or a new account but it will need to have access to your channel database (e.g. RetailContosoStore)
- You can retrieve the server name from the RDP client you use to remote desktop into the Dynamics AX demo VM hosted on Azure.
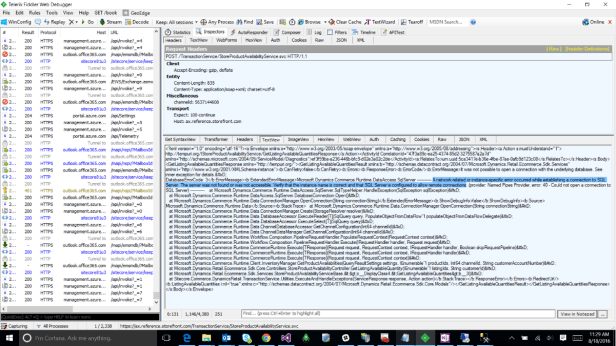
- You can use fiddler to view further details regarding the issues found in the reference site
Step 2
Create two end points for the Dynamics AX demo VM hosted on Azure to allow the outside world to communicate with both the real-time service and the channel SQL database via the CRT.
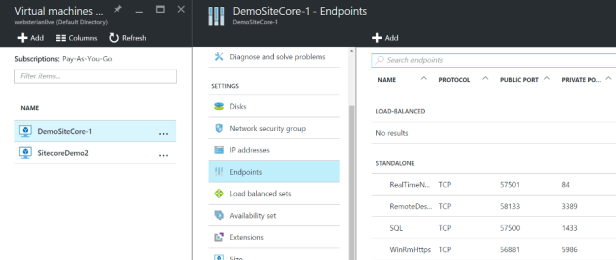
- Open the Azure portal and browse to the Dynamics AX demo VM settings and open “Endpoints”
- Create two end points for the real-time service and SQL using
Name : RealtimeService, Protocol : TCP, Public port : 57501, Private Port : 84
Name : SQL, Protocol : TCP, Public port : 57500, Private Port : 1433
Notes:
- The Dynamics AX demo VM is created as “Classic” VM, although the screen shot above is using the new azure portal. Steps for the new portal can be found here.
Step 3
Add a binding to the Dynamics AX demo VM hosted on Azures IIS to allow https (will not use net.tcp)
The default VM already has a binding for https for the real-time service used by the Contoso store. In these steps, we add a binding to allow the round trip of the service calls to the service hosted on the Azure VM. If you don’t do this you will receive errors similar the one’s outlined later on in this article.
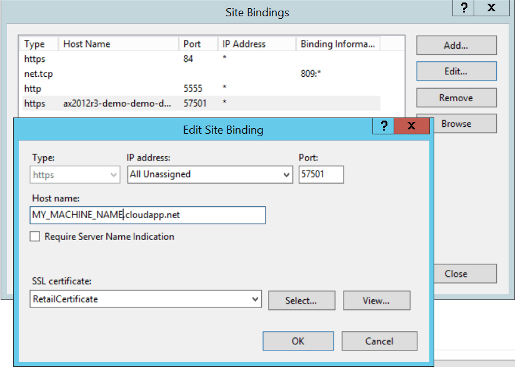
- Open IIS on the Dynamics AX demo VM hosted on Azure
- Select the Realtime service website and click bindings on the right-hand side
- Add a binding using the cloud service name of your Dynamics AX demo VM hosted on Azure as per the following
Type : https, IP : All unassigned, Port : 57501, Hostname : MY_MACHINE_NAME.cloudapp.net, SSL certificate : RetailCertificate
Step 4
As there is already a binding for https on the website a configuration must be added to web.cofig to allow multiple bindings.
- Open the web.config for the real-time service located usually here on the demo Dynamics AX VM hosted on Azure
C:\Program Files (x86)\Microsoft Dynamics AX\60\CDX\Real-time Services\6.3
- Add the following line within the <system.serviceModel> tag
<serviceHostingEnvironment multipleSiteBindingsEnabled="true"/>
Step 5
The real-time service URL and the connection string within the channel database need to be updated to use the public DNC name of the demo Dynamics AX VM hosted on Azure.
The following two scripts can be used to update these properties in the channel db directly but you can also specific them in the setup in Dynamics AX. The two example scripts are based on the RetailContosoStore.
To update the retail real time transaction service run…
update [RetailContosoStore].[ax].[RETAILTRANSACTIONSERVICEPROFILE] set CENTRALTABLESERVER = 'MY_DEMO_VM.cloudapp.net', CENTRALTABLESERVERPORT = '57501', PROTOCOL = 1
where recid = '5637144576'
To update the connection string to the channel database a view must be replaced…
DROP VIEW [crt].[STORAGELOOKUPVIEW]
go
CREATE VIEW [crt].[STORAGELOOKUPVIEW] AS
(
SELECT
dp.[NAME],
rctx.[CHANNEL] AS 'CHANNELID',
om.[OMOPERATINGUNITNUMBER] AS 'OPERATINGUNITNUMBER',
db.[SERVER],
db.[DATABASE],
CASE
WHEN ([rpct].RECID IS NULL) THEN 0
ELSE 1
END AS 'ISPUBLISHED',
CASE
WHEN (db.[DATABASE] = (SELECT DB_NAME())) THEN 1
ELSE 0
END AS 'ISLOCAL',
case db.[DATABASE]
 when 'RetailContosoStore' then 'Data Source=MY_DEMO_VM.cloudapp.net,57500;Initial catalog=RetailContosoStore;Integrated Security=false;User ID=sa;Password=pass@word1'
 else 'Data Source=' + db.[SERVER] + ';Initial Catalog=' + db.[DATABASE] + ';Integrated Security=True;Persist Security Info=False;Pooling=True;Encrypt=True;TrustServerCertificate=True'
END AS [CONNECTIONSTRING]
FROM ax.RETAILCHANNELTABLEEXT rctx
INNER JOIN [ax].[RETAILCONNDATABASEPROFILE] db ON db.RECID = rctx.LIVECHANNELDATABASE
LEFT OUTER JOIN [ax].[RETAILCHANNELTABLE] rct ON rct.RECID = rctx.CHANNEL -- Left join is required for channels published to other DB.
LEFT OUTER JOIN [ax].[OMOPERATINGUNIT] om ON om.RECID = rct.OMOPERATINGUNITID
LEFT OUTER JOIN [ax].[DIRPARTYTABLE] dp ON dp.RECID = om.RECID
LEFT OUTER JOIN [ax].[RETAILPUBRETAILCHANNELTABLE] rpct ON rpct.ORIGINID = rctx.CHANNEL
)
Step 6
Lastly, log into the content editor in Sitecore and set the server name for the Dynamics AX CRT endpoint to the cloud service DNS name of your Dynamics AX demo VM hosted on Azure.

Excellent article!
LikeLike